ARE YOU READY TO GET YOUR CAT
CATNIP-WASTED?!?!?
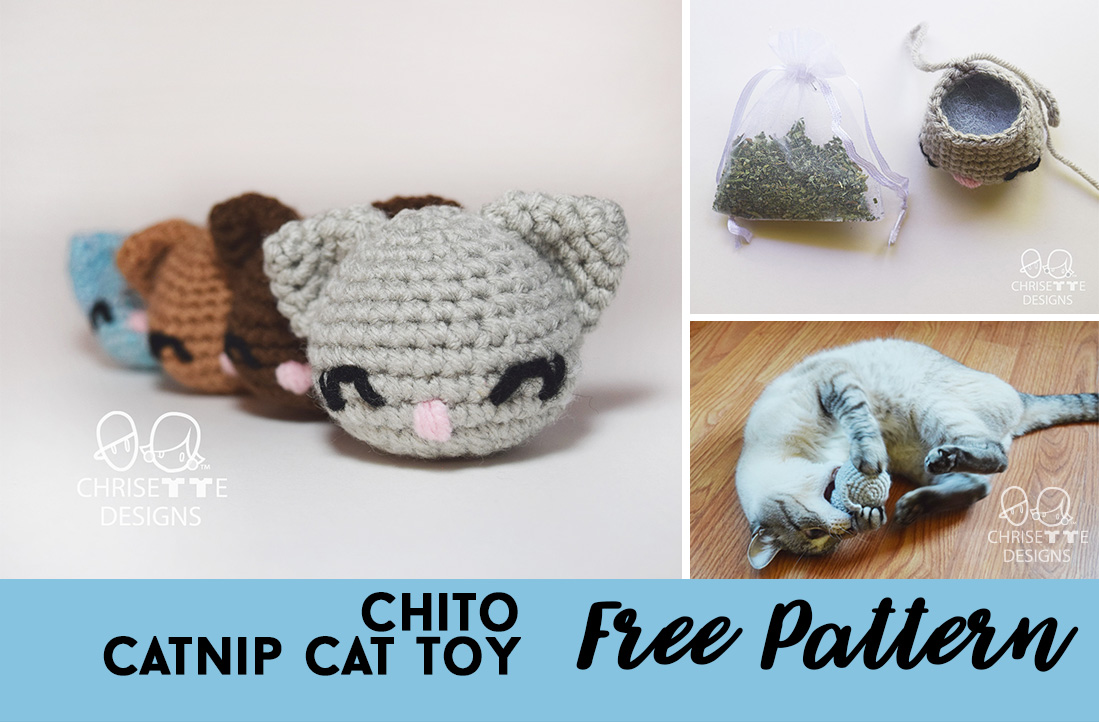
This is my parents’ cat, his name is Chito!
(The “T” is pronounced like in Spanish, so not like the snack, “Chitos”). He very unwillingly modeled for me, but I think he did a great job, he’s a natural without even trying!
I designed a cat bed for him (I’m still working on it!) and decided he needed a toy to accompany it. So the “Chito Cat Toy” was born!


Here’s some evidence that it works!
This pattern can be altered in 3 ways:
- A cat toy with catnip inside
- A cat toy with a rattle inside
- A keychain (in case your cat wants nothing to do with the lovely toy you just made by hand.)

1 
1 
2 
3
PATTERN
PDF available for purchase here!
NOTE: This is a Chrisette Designs original design.
This pattern is NOT to be SOLD.
You may sell what you make, but must use your own photos and should credit me by showing the link to my pattern here.
If you need assistance or find a site selling my pattern, please feel free to contact me at chrisettedesigns@yahoo.com Enjoy!
MATERIALS:
- Size 4 worsted weight yarn.
- Size 3.75 mm crochet hook. I use the clover brand from this set I bought, but they sell them individually too!
The Clover brand is a game-changer if you get cramps in your hands! - Stitch marker.
- Bent yarn needle: (easier to sew on pieces than with a regular straight yarn needle.)
- Polyfil.
- Keychain (optional).
- Organza bags for catnip. Amazon has them HERE
- Sewing Pins: To hold the ears in place when attaching.
- Rattle: If you don’t want to purchase a bag of them, simply go to the dollar store, buy a cat toy, and gut it open for the rattle inside AND some
stuffing !

10. Catnip (optional, but HIGHLY recommended!).
FINISHED SIZE:
Around 3 inches (7.62 cm) wide x 2 inches (5.08 cm) tall (depending on the yarn used and tension.)
STITCHES: (U.S. Terms)
Magic ring: (Tutorial below)
ch: chain
sc: single crochet
st(s): stitch(es)
sc2tog: single crochet 2 together: (Use the INVISIBLE DECREASE technique, it looks better with
NOTES:
1. Work in continuous rounds.
2. Wash instructions: follow the yarn label of the brand/material you are using.
3. Keep your tension tight so the holes aren’t too open.
4. Using stitch markers:
Make the first stitch of the row you are starting. Put the stitch marker in the stitch you just made. Crochet around. The last stitch of the row will be the one before the stitch marker. To begin the new round, take the stitch marker out, do one stitch where the marker was, and replace the marker right where you just stitched. Here is a video tutorial:


DO NOT CUT YOUR YARN!


NOSE


EYES


*Skip to the whiskers if you don’t want the eyelashes.*


One eye is finished!


*Note: You will do the right eye the OPPOSITE way of the first eye.


WHISKERS


Continue the head from where you left off after row 8.

Fill with polyfil and the rattle AND/OR catnip.


CLOSING THE BALL
This is what it looks like after row 15:

For those who prefer to see this part in video, I have a tutorial below!
Fasten off with a tail that is long enough to go through each stitch, and some excess to be able to sew the end inside of the ball.
Using a BENT YARN NEEDLE, sew the hole closed by going through the FRONT LOOP ONLY of each of the 6 sts.


Pull tight to close the hole.

Hide the tail on the inside of the ball by going through the center hole.

Come back out of the ball away from the top. Then go back inside one stitch from where you just came out.

Repeat this about 2 times or more to secure the end, then cut any excess of the tail end off.
This is what it looks like when finished.
A nice clean finish that looks like the
magic ring at the beginning!

EARS


If your cat doesn’t play with it,
make it into a keychain!

This is the keychain I used, any will work!

I simply opened up the ring and weaved it into a stitch at the top of the cat head, super easy!
It definitely makes it easier to find it in your purse!


ALL DONE!
If you liked this pattern, please support me on Ko-Fi!
I’d love it if you guys tagged me on social media so I can see your Chito Cat toys! Or use the hashtag #chrisettedesigns
Instagram
Facebook
Twitter
 Subscribe for a FREE baby set pattern & updates! (All the cool kids are doing it.)
Hi there,
Cat toys are the best object to keep our pet busy. Thank a lot for sharing these idea with us. The pattern of the cat toy crochet is interesting. I think I will try it soon. Thanks for sharing.
My mom’s cat went crazy for this! Enjoy the pattern and I’d love to see pics of it if you share on Instagram or Facebook and tag me @chrisette_designs 🙂